この記事は、Google Apps Script を利用して、LINEに定期的にメッセージを送信する方法を記載しています。
LINE Notifyでの設定
LINE Notifyのサイトは下記から。
LINE Notify→ https://notify-bot.line.me/ja/
①LINE Notifyにログインする
![line-notify-gas-image2](https://hoshino-wp.com/wp-content/uploads/2019/06/line-notify-gas-image2-700x534.png)
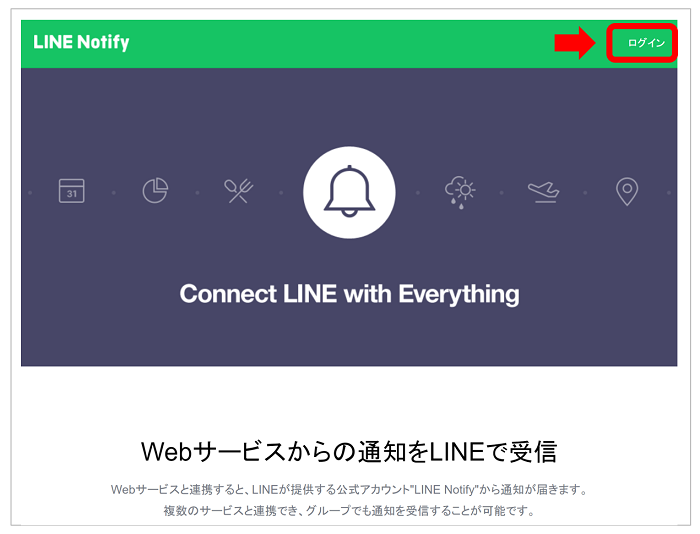
サイトの右上「ログイン」から、自分のLINEアカウントを入力してログインしてください。
②マイページを開く
![line-notify-gas-image3](https://hoshino-wp.com/wp-content/uploads/2019/06/line-notify-gas-image3-300x221.png)
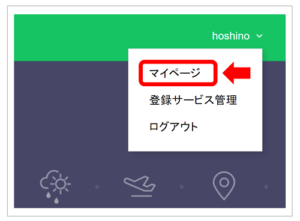
ログイン後、アカウント名をクリックし「マイページ」を開きます。
③アクセストークンを発行する
![line-notify-gas-image4](https://hoshino-wp.com/wp-content/uploads/2019/06/line-notify-gas-image4.png)
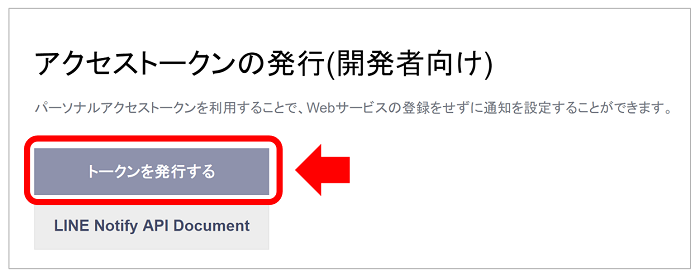
「アクセストークンの発行(開発者向け)」から「トークンを発行する」をクリックします。
![line-notify-gas-image6](https://hoshino-wp.com/wp-content/uploads/2019/06/line-notify-gas-image6.png)
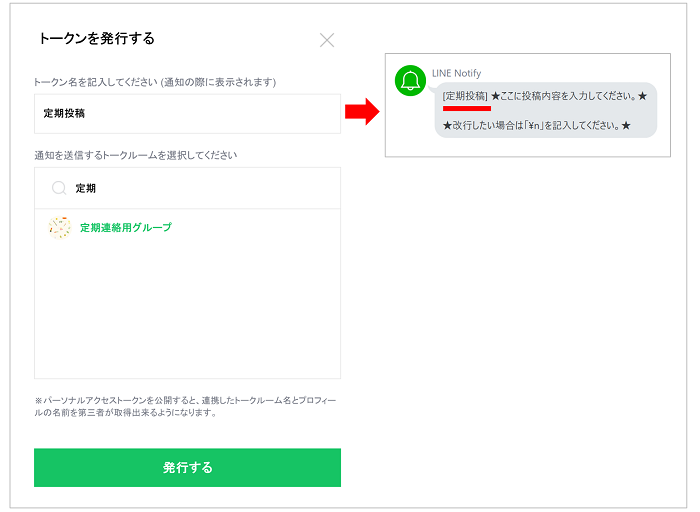
「トークン名」は投稿内容の最初に[ ]付きで表示されます。通知内容がわかるタイトルを記入するのがよいです。
「通知を送信するトークルーム」には、通知を送信したいグループを選択してください。
設定が完了したら「発行する」をクリックしてください。
![](https://hoshino-wp.com/wp-content/uploads/2019/06/line-notify-google-apps-script-image-z.png)
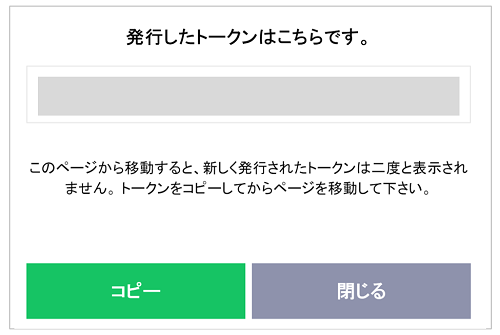
赤字でトークンが表示されるので、このページをそのまま開いておくか、メモ帳などに張り付けてから閉じてください。
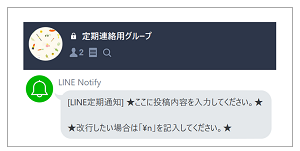
④投稿したいグループにLINE Notifyを追加する
![](https://hoshino-wp.com/wp-content/uploads/2019/06/line-notify-gas-image8.png)
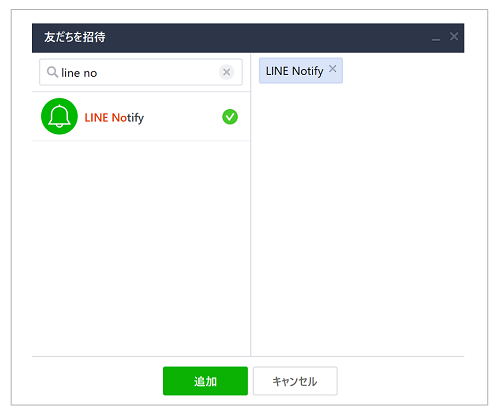
LINEから投稿したいグループをを開き、「友達を招待」からLINE Notifyを友達に追加します。
LINE Notifyの設定は以上です。
Google Apps Scriptでコードを書く
①Googleドライブを開く
![line-notify-gas-image9](https://hoshino-wp.com/wp-content/uploads/2019/06/line-notify-gas-image9.png)
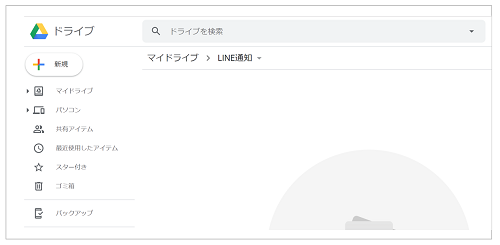
まずGoogleドライブで、ファイルを置きたいフォルダを開きます。
※Google Apps Scriptはデフォルトアカウントでなければ利用できません。
![](https://hoshino-wp.com/wp-content/uploads/2019/06/line-notify-gas-image10.png)
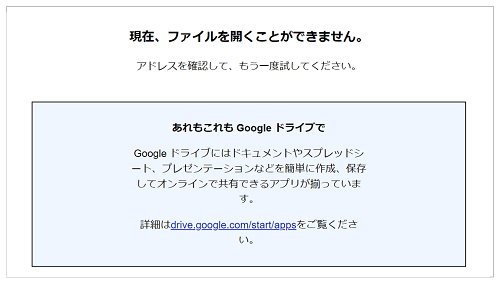
Google Apps Scriptのファイルが保存されなかったり、「現在、ファイルを開くことができません。」と表示された場合は現在のGoogleアカウントを確認してください。
②Google Apps Scriptを追加する
![](https://hoshino-wp.com/wp-content/uploads/2019/06/line-notify-gas-image11.png)
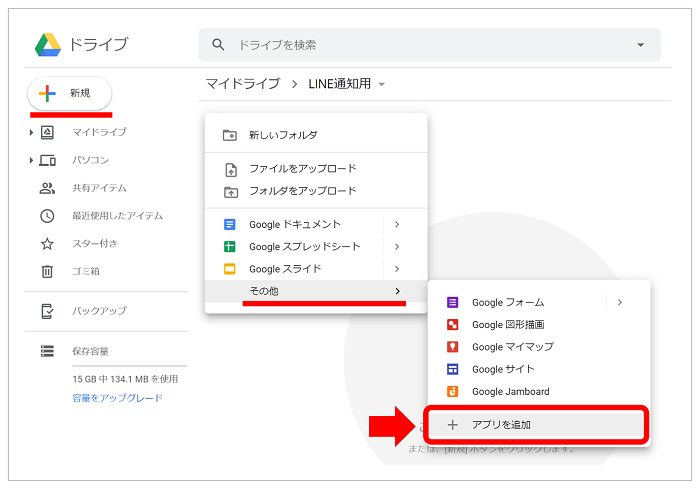
「+新規」もしくは右クリックで「その他」→「+アプリを追加」をクリックします。
![line-notify-gas-image12](https://hoshino-wp.com/wp-content/uploads/2019/06/line-notify-gas-image12.png)
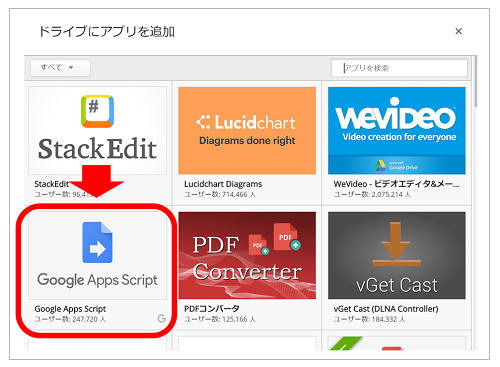
Google Apps Scriptにカーソルを合わせて「接続」をクリックします。
③Google Apps Scriptを開く
![line-notify-gas-image13](https://hoshino-wp.com/wp-content/uploads/2019/06/line-notify-gas-image13.png)
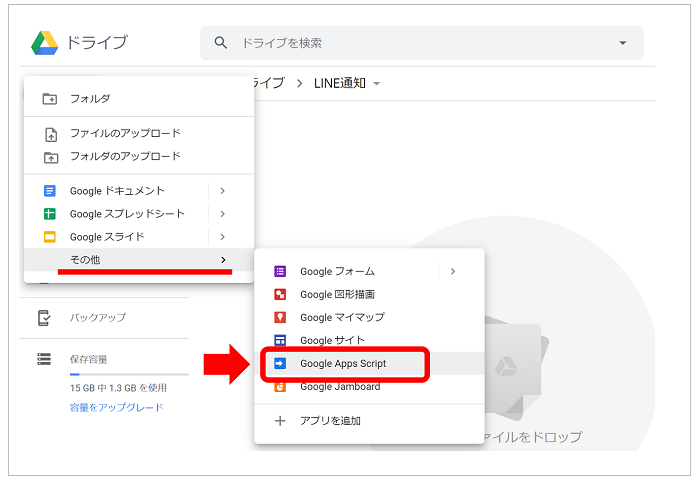
「+新規」もしくは右クリックで「その他」からGoogle Apps Scriptを開きます。
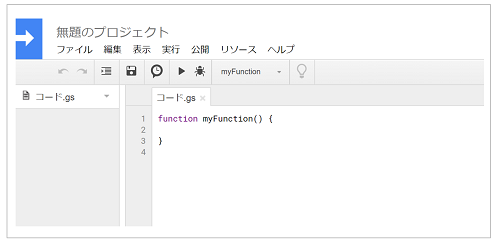
![line-notify-gas-image14](https://hoshino-wp.com/wp-content/uploads/2019/06/line-notify-gas-image14.png)
開くとこのように表示されます。
④プロジェクト名を入力する
![](https://hoshino-wp.com/wp-content/uploads/2019/06/line-notify-gas-image15.png)
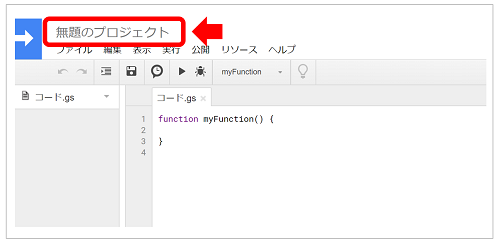
ドライブに表示されるGoogle Apps Scriptのファイル名を入力します。
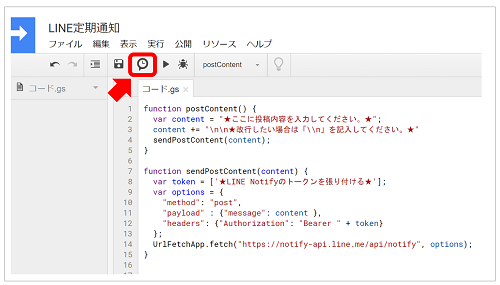
⑤コードを記述する
![](https://hoshino-wp.com/wp-content/uploads/2019/06/line-notify-gas-image16.png)
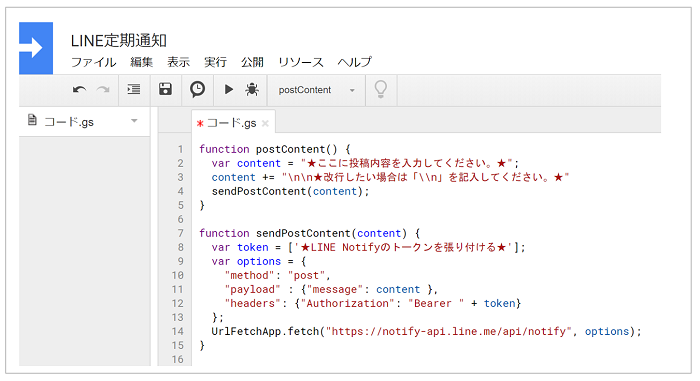
上記のようなコードでLINE Notifyから投稿できるようになります。
function postContent() {
var content = "★ここに投稿内容を入力してください。★";
content += "\n\n★改行したい場合は「\\n」を記入してください。★"
sendPostContent(content);
}
function sendPostContent(content) {
var token = ['★LINE Notifyのトークンを張り付ける★'];
var options = {
"method": "post",
"payload" : {"message": content },
"headers": {"Authorization": "Bearer " + token}
};
UrlFetchApp.fetch("https://notify-api.line.me/api/notify", options);
}
content=の後の★は投稿される内容を記入する箇所です。自由に変更してください。
token=の後の★はLINE Notifyで発行したトークンを張り付けてください。
⑥LINEに投稿されるか確認する
コードを実行してみましょう。
![line-notify-gas-image17](https://hoshino-wp.com/wp-content/uploads/2019/06/line-notify-gas-image17.png)
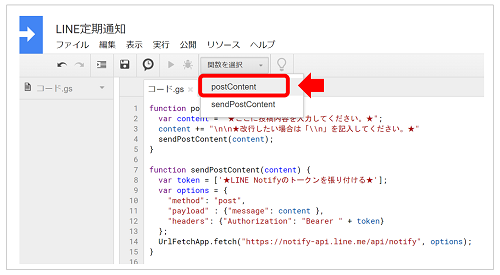
「関数を選択」から今回のサンプルコードでいうと「postContent」を選択してください。
![line-notify-gas-image18](https://hoshino-wp.com/wp-content/uploads/2019/06/line-notify-gas-image18.png)
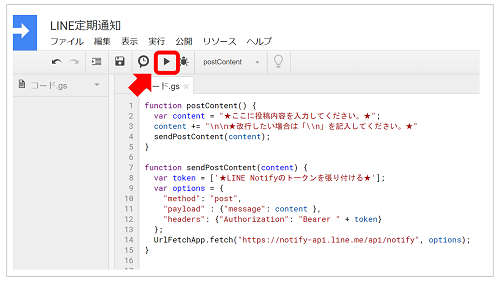
関数を選択したら「▶」をクリックしてください。
![line-notify-gas-image19](https://hoshino-wp.com/wp-content/uploads/2019/06/line-notify-gas-image19.png)
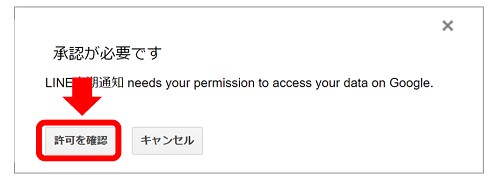
「承認が必用です」と表示されたら「許可を確認」をクリックして、アカウントを選択してください。
![line-notify-gas-image20](https://hoshino-wp.com/wp-content/uploads/2019/06/line-notify-gas-image20.png)
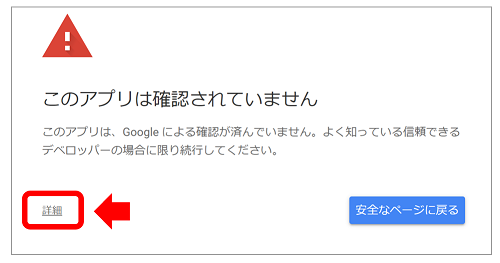
その後「このアプリは確認されていません」と表示されたら、「詳細」をクリックします。
![line-notify-gas-image21](https://hoshino-wp.com/wp-content/uploads/2019/06/line-notify-gas-image21.png)
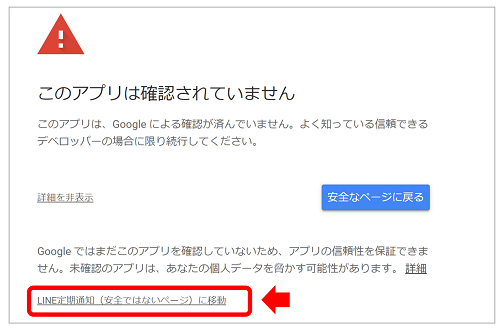
「LINE定期通知(安全ではないページ)に移動」→「許可」の順にクリックしてください。
再度「▶」をクリックしてLINEの指定したグループに、投稿されたらOKです。
![line-notify-gas-image22](https://hoshino-wp.com/wp-content/uploads/2019/06/line-notify-gas-image22.png)
⑦投稿されるタイミングの設定をする
最後に、どのタイミングで投稿されるようにするか設定します。
![line-notify-gas-image23](https://hoshino-wp.com/wp-content/uploads/2019/06/line-notify-gas-image23.png)
時計のマークをクリックし、この画面を表示します。
![line-notify-gas-image24](https://hoshino-wp.com/wp-content/uploads/2019/06/line-notify-gas-image24.png)
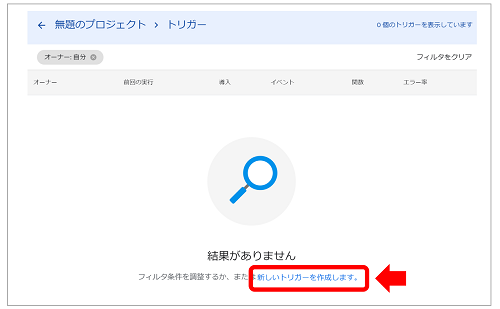
「新しいトリガーを作成する」をクリックします。
変更するのは以下の2か所です。
![line-notify-gas-image25](https://hoshino-wp.com/wp-content/uploads/2019/06/line-notify-gas-image25.png)
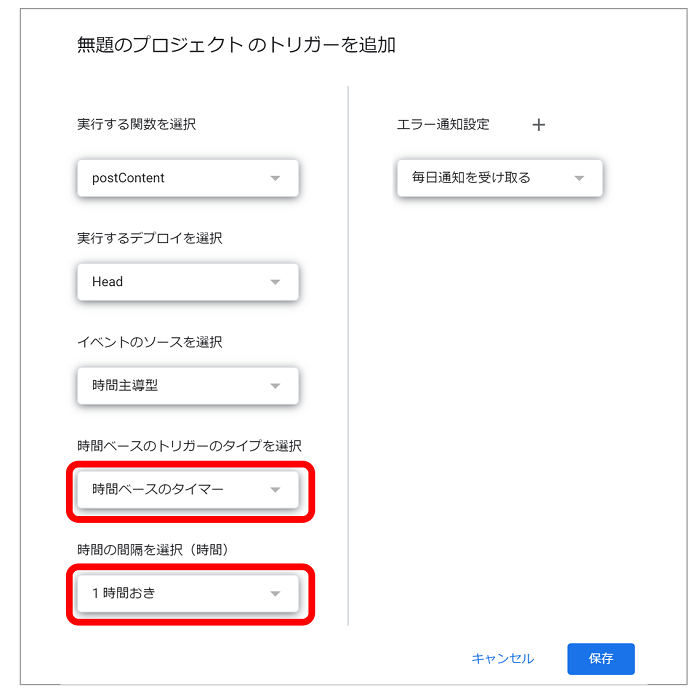
「時間ベースのトリガーのタイプを選択」は分単位、時間単位、日単位…と選択することができます。
![line-notify-gas-image26](https://hoshino-wp.com/wp-content/uploads/2019/06/line-notify-gas-image26.png)
特定の時間に通知したい場合は「日付ベースのタイマー」を設定します。
すると、一番下の設定項目が「時刻を選択」となるので、通知したい時間を設定してください。
![line-notify-gas-image27](https://hoshino-wp.com/wp-content/uploads/2019/06/line-notify-gas-image27.png)
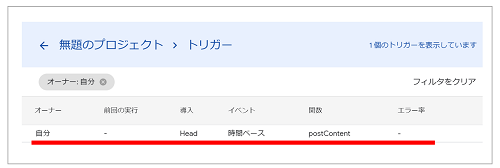
保存して、トリガーが追加されたら完了です。
Google Apps Scriptを利用した便利機能
GASを使えば、上記のような固定メッセージだけでなく、メールや予定の通知など、様々な情報を送る事もできます。
以下の記事で、具体的な内容を紹介しているので、よかったら参考にしてください。
→ Googleカレンダーの予定を開始15分前とかにLINEで通知する方法
以上、GASを使ってLINEに通知する方法の紹介でした。